How Ship It Works
Ship It proxies requests to your app. This allows it to manage TLS (HTTPS) and ensure that the user is authenticated and has an active subscription before accessing pages based in your configuration.
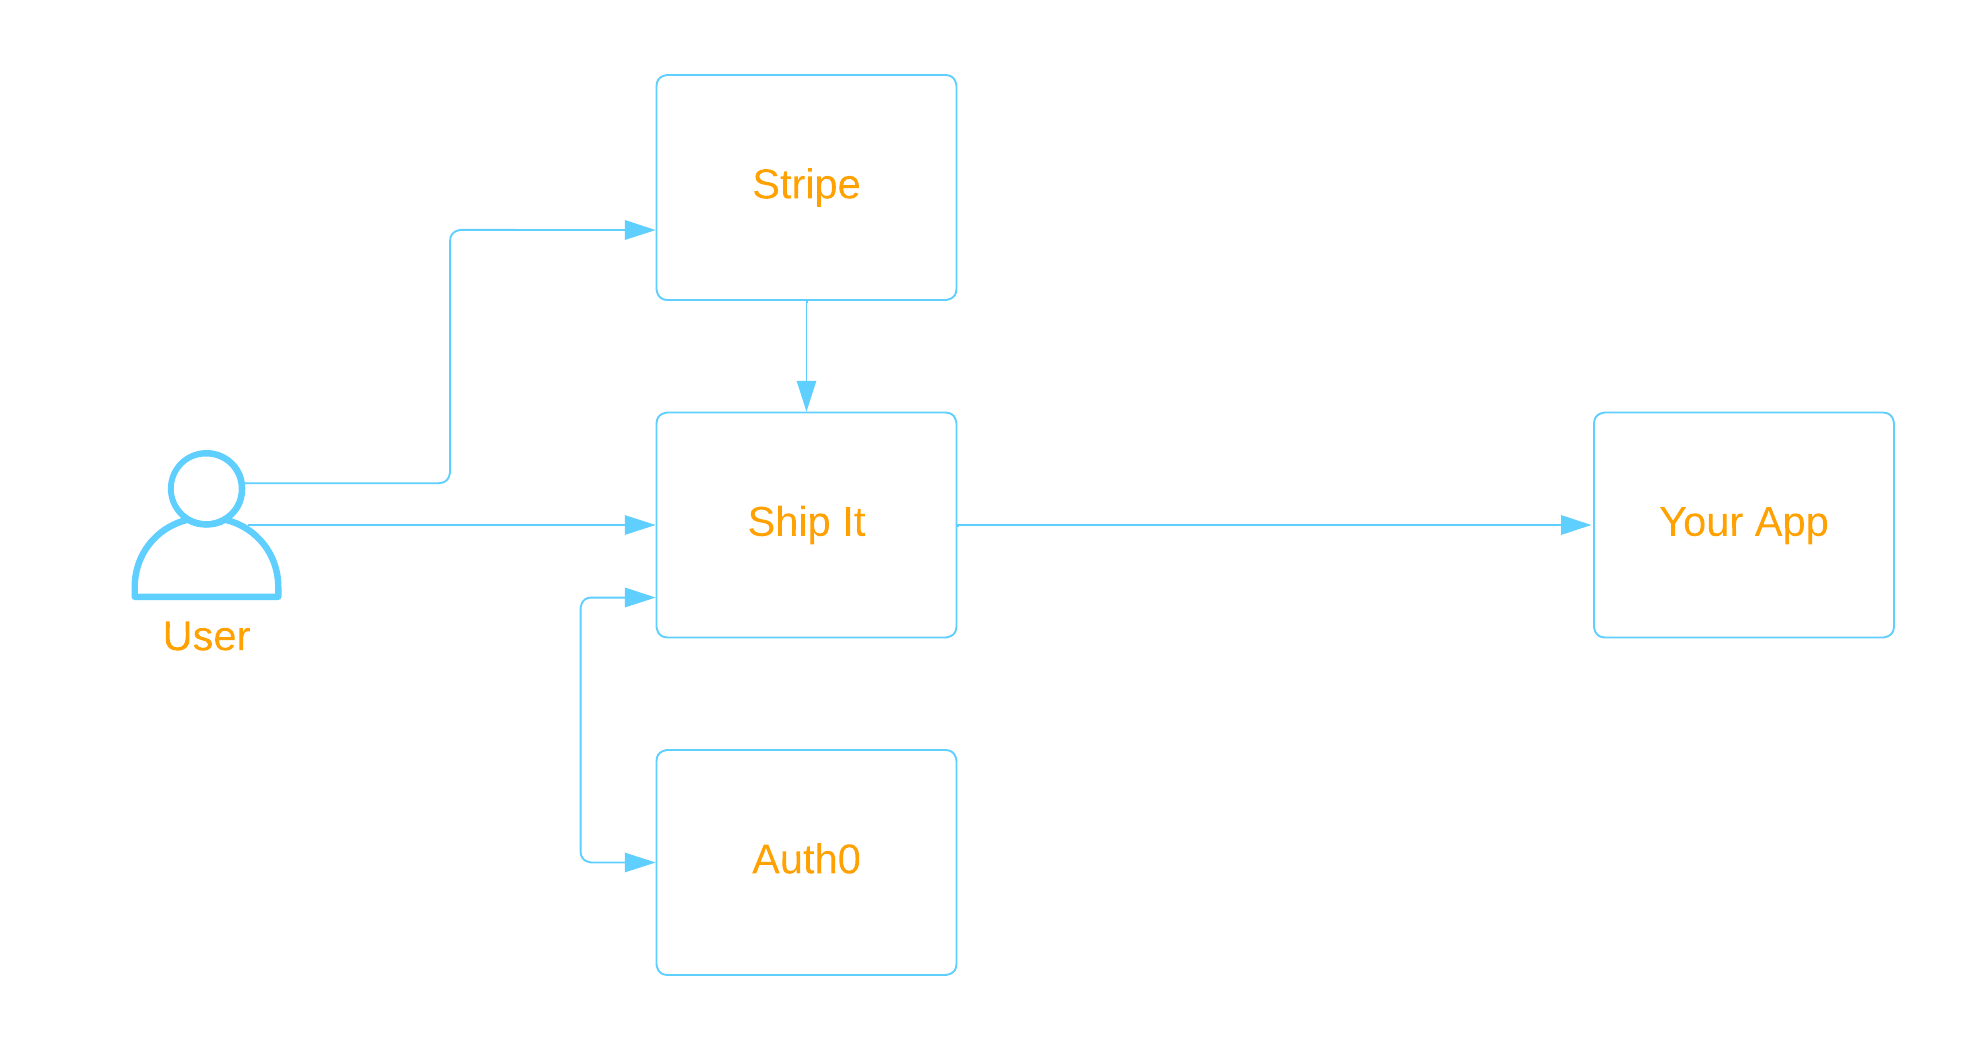
Ship It is implemented using Cloudflare Workers, meaning that the proxy is served from their 275+ edge data centers, which minimizes the latency that it introduces.
Configuration
Ship It is easy to connect to your existing Auth0 and Stripe accounts.
- DNS: Create a
CNAMEDNS record from your domain toship-proxy.com. - Auth0: Create a new Auth0 Application and share the credentials with Ship It.
- Stripe: Connect with Stripe and select products / prices.
- Paths: Configure which paths on your site require authentication or an active subscription.
- Validation Update your app to validate requests from Ship It.
DNS Configuration
Ship It verifies ownership of your domain name using a DNS record. You must create a DNS CNAME record from the public hostname
specified for your site to ship-proxy.com. After this occurs, it can take a few minutes for ownership to be verified and the
certificate to be created. You can view detailed instructions and the status of verification by clicking Verification Status
when viewing a specific site.
CNAME record for a top level domain (i.e. example.com) may require you to use a registrar which supports apex CNAME records, such as Cloudflare.
Auth0 Integration
OAuth Application
To integrate with Auth0, Ship It needs a client application identity. Create a new Regular Web Application in your Auth0 tenant. Ship It will need the domain, client id, and client secret for this application (not the tenant).
You will need to configure the application in a few places. In each case, substitute the public hostname for your site.
- Application Login URI:
https://HOSTNAME/shipit/oauth2/login - Allowed Callback URLs:
https://HOSTNAME/shipit/oauth2/callback - Allowed Logout URLs:
https://HOSTNAME/
Login Providers
Ship It supports any of the login providers that you can configure through Auth0. You can manage which login options are available to your users by configuring authentication providers in Auth0 under the Authentication section, and then enabling them for the Application configured above under the Application's Connections tab.
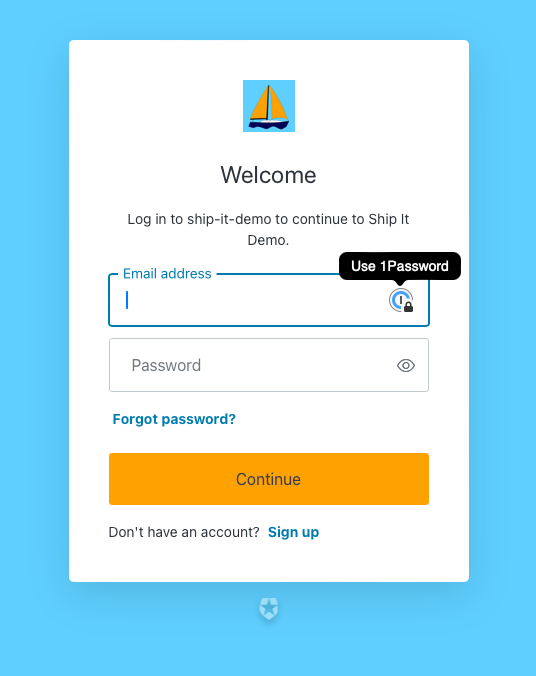
Branding
You can customize the login experience branding, by customizing the Auth0 Universal Login configuration (User Management > Branding > Universal Login).
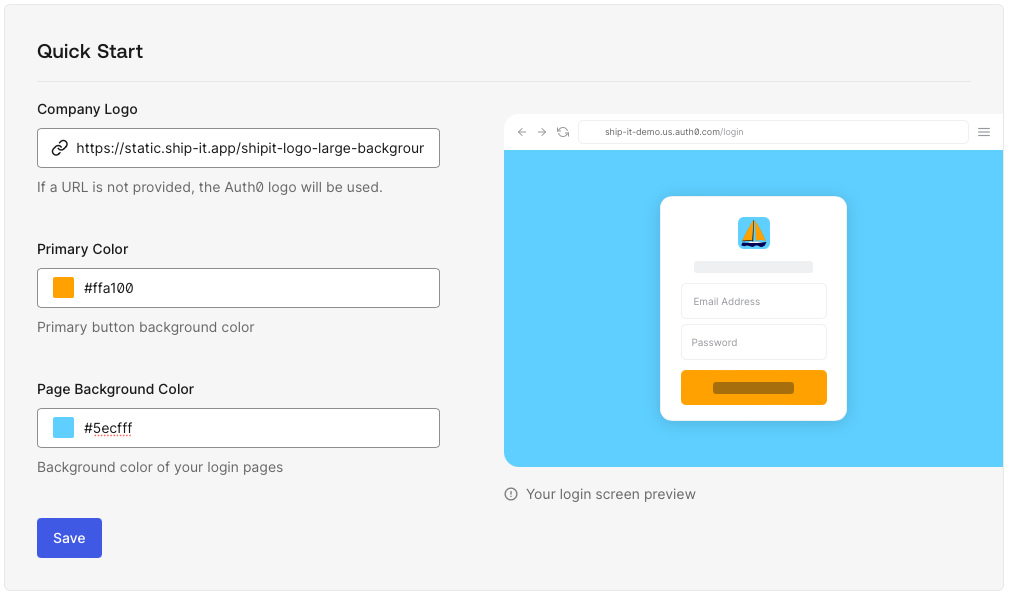
This results in the following branded login experience:
Stripe Integration
Set Up
Ship It integrates with Stripe using Stripe Connect. After creating a site, select Link with Stripe to connect your account.
After linking, Ship It will display all active, non-tiered, recurring prices and products.
You must select at least one price option for your site to be active.
To enable a trial period for a price, set its corresponding Trial Days field to a non-zero number of days.
Pricing Table
When multiple prices are enabled, Ship It will display a pricing table for users to select a tier.
The Stripe Product's description and unit label are used to customize the table.
If you wish to customize the formatting of the description text (such as bullet points), HTML and CSS can be used.
The tier (Stripe Product name) that the user subscribes to is made available to your app via the x-subscription-tier
header.
Adjustable Quantity
You can further configure the billing experience by allowing users to adjust their subscription quantity.
This can enable approximate opt-in usage-based billing. The subscribed quantity is made available to your app via
the x-subscription-quantity header.
Branding
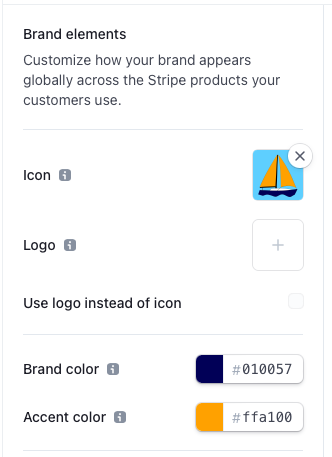
Branding for Stripe checkout and management screens can be configured through Stripe under your account branding configuration. When multiple prices are selected, Ship It will render a pricing table which uses the brand and accent colors defined in this configuration. When a user completes a purchase, Ship It will render a thank you page using the same colors. Both pages will display the logo if it is set in the branding configuration.
Resulting pricing table appearance:

Route Access
By default, Ship It requires that the user is logged in and has an active subscription for all paths.
You can specify regular expressions to bypass authentication or billing checks for certain paths like landing pages, marketing pages, or documentation. Ship It applies the following logic:
- If the authentication pattern matches, neither authentication nor billing is enforced.
- If the billing pattern matches, only authentication is enforced.
Here are some example regular expressions:
a^- Default pattern, matches nothing.^(\\/|\\/docs)$- Match/and/docs.
A good tool for writing and debugging regular expressions is RegExr.
Usage
Once you have set up Ship It, most customization can be done using Stripe and Auth0. There are a few ways in which you can integrate more tightly with Ship It to provide your users with a better experience.
- Validation: For production sites you should validate requests and make sure that you can trust the content.
- Statistics: Ship It offers some simple analytics to view site traffic.
- Headers: Identify users based on request headers and customize their experience.
- Routes: Easily link to allow users to log in, out, or manage their account.
Request Validation
Ship It Signature
The Auth0 token provided in the X-User-Token header can be used to confirm that the user is authenticated with Auth0,
but in order to verify that the billing headers described above originated from Ship It, you must verify the Ship It signature
header. This can be done using the public key visible on the sites configuration page in the Ship It dashboard.
JavaScript / TypeScript
Please use the @ship-it-app/validate package to easily validate headers from Ship It.
Install
npm i @ship-it-app/validate
Usage
import { validate } from '@ship-it-app/validate';

async function fetch(request, env) {
    const isValid = await validate(
		env.REQUEST_PUBLIC_KEY,
		request.headers.get('X-Proxy-Signature'),
		request.headers.get('X-Proxy-Timestamp'),
		request.headers.get('X-User-Sub'),
	);
    if (!isValid) {
        return new Response(
            "unauthorized",
            {
                status: 401
            }
        );
    }
}
Python
Please use the ship-it-validate package to easily validate headers from Ship It.
Install
pip install ship-it-validate
Usage
For example, validate headers before every request in a Flask app:
from ship_it_validate import validate
from flask import request

@app.before_request
def before_request():
    try:
        validate(
            request.headers.get('X-PROXY-SIGNATURE'),
            request.headers.get('X-USER-SUB'),
            request.headers.get('X-PROXY-TIMESTAMP'),
        )
    except ValueError as e:
        app.logger.warning('Invalid Ship It signature: %s', e)
        return "Unauthorized", 401
Ruby
Coming Soon
Rust
Here is an example of validating the signature in Rust using the jsonwebtoken crate:
[dependencies]
base64="0.22"
jsonwebtoken= { version="9", default-features = false }
#![allow(unused)]
fn main() {
use http::{HeaderMap, HeaderName, HeaderValue};
use jsonwebtoken::Algorithm;

#[derive(Debug)]
#[allow(dead_code)]
pub enum Error {
    Base64(base64::DecodeError),
    Deserialize(serde_json::Error),
    Jwt(jsonwebtoken::errors::Error),
}

/// Validate the request headers using the public key provided by Ship It.
/// - Returns `Ok(true)` if the signature is valid and the headers can be trusted.
/// - Returns `Ok(false)` if the request is invalid (return 400 Bad Request
///   or 401 Unauthorized).
/// - Returns an `Err(Error) if an unexpected internal error
///   occurred (return 500 Internal Server Error).
pub fn validate(
	// The base64-encoded public key obtained from the Ship It UI
	jwk_encoded: &str,
	// The request headers
	headers: &HeaderMap<HeaderName, HeaderValue>
) -> Result<bool, Error> {
    use base64::Engine;

    // Parse Key, you may only want to do this once
    let jwk_string = base64::prelude::BASE64_STANDARD
        .decode(jwk_encoded)
        .map_err(Error::Base64)?;
    let jwk: jsonwebtoken::jwk::Jwk =
        serde_json::from_slice(&jwk_string).map_err(Error::Deserialize)?;
    let key = jsonwebtoken::DecodingKey::from_jwk(&jwk).map_err(Error::Jwt)?;

    // Headers
    let sig_encoded = match headers.get("X-Proxy-Signature") {
        Some(sub) => sub.as_bytes(),
        None => return Ok(false),
    };
    let sub = match headers.get("X-User-Sub") {
        Some(sub) => sub.as_bytes(),
        None => return Ok(false),
    };
    let timestamp = match headers.get("X-Proxy-Timestamp") {
        Some(sub) => sub.as_bytes(),
        None => return Ok(false),
    };

    // Signature
	// `jsonwebtoken` expects a slightly different base64 encoding than the one sent
	// by Ship It, so we re-encode.
    let Ok(sig) = base64::prelude::BASE64_STANDARD.decode(sig_encoded) {
			return Ok(false);
	}
    let sig_encoded = base64::prelude::BASE64_URL_SAFE_NO_PAD.encode(&sig);

    // Payload
    let mut message = Vec::with_capacity(sub.len() + timestamp.len() + 1);
    message.extend_from_slice(sub);
    message.push(b'@');
    message.extend_from_slice(timestamp);

    // Validation
    let is_valid =
        jsonwebtoken::crypto::verify(&sig_encoded, &message, &key, Algorithm::ES256)
            .map_err(Error::Jwt)?;

    Ok(is_valid)
}
}
wasm-bindgen to implement the JavaScript validation to avoid increasing WebAssembly bundle size. If you do want to compile the Rust version to WebAssembly, there is a known issue compiling ring to wasm32-unknown-unknown on MacOS which can be resolved by installing a different version of LLVM.
Other Languages
If you need to implement verification in a new language, it can be done as follows:
- Base64 decode the public key and parse it as JSON to obtain the
P-256 ECDSAJSON Web Key (JWK) which can be used with many JSON Web Token (JWT) libraries. - Use the
X-Proxy-SubandX-Proxy-Timestampheaders to form the string "SUB@TIMESTAMP". - Base64 decode the signature, and use a cryptography library to verify the signature for the string from step 2 using the JWK from step 1.
Here is a reference implementation in TypeScript:
function byteStringToUint8Array(byteString: string): Uint8Array {
	const ui = new Uint8Array(byteString.length);
	for (let i = 0; i < byteString.length; ++i) {
		ui[i] = byteString.charCodeAt(i);
	}
	return ui;
}

export async function verify_request(
	env: Env,
	receivedMacBase64: string | null,
	sub: string | null,
	timestamp: string | null
): Promise<boolean> {
	const jwk: JsonWebKey = JSON.parse(atob(env.REQUEST_PUBLIC_KEY));

	if (!receivedMacBase64 || !sub || !timestamp) {
		return false;
	}

	const key = await crypto.subtle.importKey(
		"jwk",
		jwk,
		{
			name: "ECDSA",
			namedCurve: "P-256",
		},
		false,
		["verify"]
	);
	const encoder = new TextEncoder();
	const payload = `${sub}@${timestamp}`;

	const receivedMac = byteStringToUint8Array(atob(receivedMacBase64));

	const verified = await crypto.subtle.verify(
		{ name: "ECDSA", hash: "SHA-256" },
		key,
		receivedMac,
		encoder.encode(payload)
	);

	return verified;
}

export default {
	async fetch(request: Request, env: Env, ctx: ExecutionContext): Promise<Response> {
		const receivedMacBase64 = request.headers.get('X-Proxy-Signature');
		const timestamp = request.headers.get('X-Proxy-Timestamp');
		const sub = request.headers.get('X-User-Sub');
		const isValid = await verify_request(env, receivedMacBase64, sub, timestamp);
		if (!isValid) {
			return new Response('Unauthorized', { status: 401 });
		}

		// Handle valid request.
	},
};
Auth0 JWT
Ship It provides you with the user's access_token obtained from Auth0. If you wish to confirm that
a request is legitimate and that it originates from a user that has authenticated with Auth0, you can
validate this token, and also
use it to fetch information about the user from Auth0.
Site Statistics
If you click Statistics on the view / edit site page, then you can view the number of requests your site has served in the last
month (and broken down by path). These numbers may be estimates based on sampling and can take a few minutes to update.
Headers
Ship It provides your application with headers which can be used to customize the user's experience based on their identity and subscription tier. For production deployments, be sure to validate the request. Headers will only be present if the user is authenticated.
X-User-Email: The email address of the user obtained from Auth0.X-User-Sub: A unique user id obtained from Auth0.X-User-Token: Auth0access_tokenfor user's session.X-Subscription-Tier: The Stripe Product that the user is subscribed to (or "Free" if not subscribed).X-Subscription-Quantity: The quantity of the Stripe subscription (or 0 if not subscribed).X-Proxy-Signature: Ship It signature (see below).X-Proxy-Timestamp: Timestamp used by Ship It for signature.
Routes
Ship It provides a number of useful paths which will redirect your users in several ways. You can use these to add simple links to your site to allow users to logout, manage their subscription, etc.
/shipit/oauth2/login: Redirect your user to log in with Auth0./shipit/oauth2/login?returnTo=signUp: Redirect your user to sign up with Auth0, and then display subscription options./shipit/oauth2/logout: Log your user out./shipit/stripe/table: Display pricing table (if multiple prices are selected)./shipit/stripe/manage: Display Stripe Customer Portal for managing the user's subscription and billing info./shipit/stripe/checkout/:stripe_price_id: Create Stripe Checkout session for a particular price.